Here's a brief description of the setup process of the common Foscam models (without SD card slot)
1) Firstly, connect the camera to the router via the network cable provided to one of the 4 identical ports behind the router (if you are using fibre broadband, please make sure camera is NOT connected to the "nucleus connect ONT" but the actual router). Plug in the power adapter and power up the camera.
2) Install the "IP camera tool" software using the CD that comes with it or download the "IP camera tool" software from:
http://foscam.sg/store/index.php?route=information/information&information_id=9
3) After the software is successfully download, you will see an "IP camera tool" icon on your desktop.
Double-click on it and you will see the IP address of your IP camera:
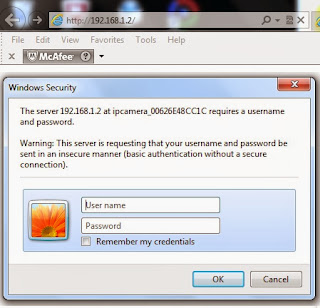
Double-click on this address and you will see the pop-up window that prompts for your username and pw. Enter the default username "admin" and password is <blank>. Then click on "OK".
You will be prompted to select the login mode. Select "ActiveX mode" ONLY if you are using IE browser. Otherwise, select "Server Push Mode" for other browser such as google chrome, firefox.
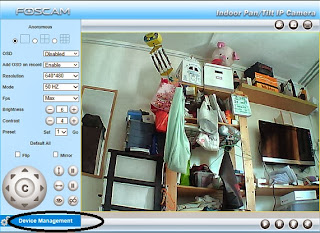
You should be able to see the video screen after you have selected the login mode. Next, click on "Device Management".
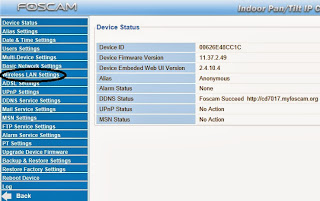
Select "Wireless LAN settings"
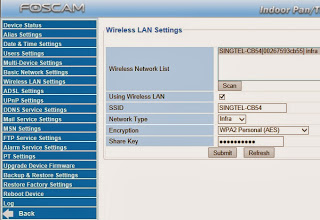
At "Wireless LAN settings", click on the "scan" button and you will see a list of wifi names of the network around your house. Select your home wifi name and enter your wifi password in enter "shared key" or "key1" (depending on what appears after you select your wifi name). Do not change any of the pre-filled settings such as Network type and Encryption. Click on "submit" after wifi pw is entered.
The camera will reboot and countdown from 30 secs to 0 sec. During this time, you can remove the network cable from the back of the camera.

After the camera has finished the countdown, please click on the "IP camera tool" icon installed on your desktop again. It should display the new IP address in wireless mode.


From here, you can change the port number of the camera by left-click once on the IP address to highlight it in blue, then right click on the IP address again and select "Network Configuration"
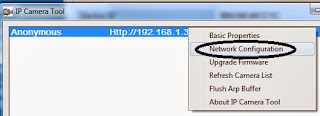
Under Network Configuration, please change the default http port from "80" to any number greater than 80, for eg "8091" used in this example. Then click on "OK" and the IP address will disappear from the IP camera tool and appear again after 1 min.
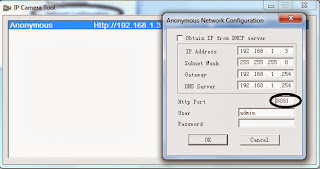
After the IP address reappears on the tool, you will notice that the "http port" number you have assigned is appended to the back of the IP address ":8091". Note down this IP address and port number as these are the information that you need to do the port forwarding step in your router settings.
 Port Forwarding for remote viewing
For port forwarding, different routers will have different settings but the information to enter are generally the same, which is just the IP address of the cam, its corresponding port no and protocol (select "TCP/UPD" or both). For the port forwarding steps of the specific router you are using, you can refer to this link:
http://portforward.com/english/routers/port_forwarding/routerindex.htm
For this example, we will use the common Aztech DSL1015EN-L router from Singtel. We can look for the port forwarding steps of this Aztech router with the link above and it will show us the specific steps here:
http://portforward.com/english/routers/port_forwarding/Aztech/DSL1015EN-L/Foscam_FI8910.htm
Routers that comes from Singtel have a default IP address of 192.168.1.254. Therefore, we open up a new browser page and enter the IP address
http://192.168.1.254 From here, we select "Firewall Configuration" -> "Port Forwarding", check on the "Custom Server" radio button and enter a name for this custom server, eg cam1. Enter the camera IP address (192.168.1.3) under "Server IP Address", all the fields involving port no we will just enter the port "8091" which we have assigned to the camera. Therefore "External port start", "External Port End", Internal Port Start" and "Internal Port End" are all "8091", Protocol will be both "TCP/UDP". Click on the "Save" button after all above are filled up.
After this port forwarding settings is done, we can verify if it is successful by going to
www.canyouseeme.org and enter the port number of the camera (8091) to check:
If you see the message "Success, I can see your service...." It means your port forwarding has been done successfully and you should be able to view your camera remotely. To view the camera from a remote location, you can either use the external IP address found in canyouseeme.org append with the port no. For our above eg is
http://202.156.242.91:8091 or using the DDNS address found at the bottom of the camera. eg
http://aa1111.myfoscam.org:8091.
Setting up on iPhone/Android
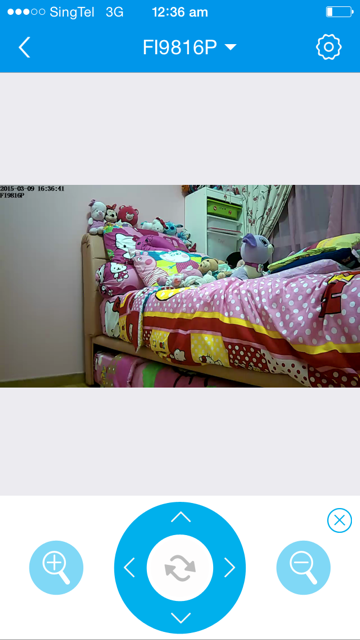
For viewing the camera from your mobile phone, it's better to use the mobile app. We recommend using "IP cam viewer lite" (free app found on both iPhone and Android)
After downloading the app on your mobile, tap on it and go to "
Manage Cameras". Tap on "
Add Camera" and
1) Select "
IP camera, DVR, NVR".
2) Enter a
Name for your camera
3) Select the "
Type" as Foscam FIxxxx (the model of your camera)
4)
IP/Host is your DDNS address, i.e xxxxxx.myfoscam.org
5) Choose "
HTTP" (no S)
6) and enter the
Port no given to your camera.
7)
User is default "admin"
8)
Password is blank unless you have changed it.
Click on "test" and "save" the settings if the video is retrieved successfully.
** Please turn off the wifi on your mobile phone and test only with 3G/4G network as some routers such as Aztech and Singtel 2wire does not allow viewing the camera with the same wifi network using the external IP or DDNS address.


.png)
.png)
.png)
.png)
.png)
.png)
.png)
.png)
.png)
.png)


